


Assessing damage is key in rear bumper repair, guiding selection between simple PDR for minor dents or complex auto body repair for severe cracks. A meticulous process, it begins with thorough damage assessment, preparation (debris removal, rust prevention), and ends with restoration using authentic parts and proper techniques to ensure quality, structural integrity, and aesthetic appeal.
“Discover top-notch rear bumper repair best practices as recommended by industry experts. This comprehensive guide covers everything from assessing damage and selecting the perfect repair method to a detailed, step-by-step restoration process. Learn how to avoid common pitfalls during the repair process and ensure your vehicle’s rear bumper looks good as new. Master these expert tips for seamless and effective rear bumper repair.”
- Assessing Damage and Choosing the Right Repair Method
- Step-by-Step Guide to Effective Rear Bumper Restoration
- Common Pitfalls to Avoid During the Repair Process
Assessing Damage and Choosing the Right Repair Method
Assessing damage is the first step in any rear bumper repair. Before choosing a repair method, carefully inspect the bumper for dents, cracks, or other types of damage. The extent of the damage will determine whether simple dent removal techniques like paintless dent repair (PDR) are suitable, or if more involved auto body repair methods are required.
Paintless dent repair is a popular and effective choice for minor to moderate dents as it preserves the original factory finish. This method uses specialized tools to gently push out the dent from behind the bumper panel without affecting the paint job. For more severe damage, such as deep cracks or broken components, traditional auto body repair techniques involving replacement and repainting may be necessary. Choosing the right approach ensures a quality rear bumper repair that restores both functionality and aesthetic appeal.
Step-by-Step Guide to Effective Rear Bumper Restoration

Rear bumper repair is a task that requires precision and care to ensure your vehicle looks as good as new. Here’s a step-by-step guide for an effective rear bumper restoration:
1. Assess the Damage: Begin by thoroughly inspecting the bumper to understand the extent of the damage. Identify cracks, dents, or scratches. This will help you determine whether simple touch-ups or more involved frame straightening and auto body painting are required. For severe cases, professional car paint services might be indispensable.
2. Prepare the Area: Once you’ve established the repair needs, clear the bumper of any debris or loose parts. Remove any rust or corroded areas using appropriate tools and chemicals to ensure a clean surface for repairs. This step is crucial as it prevents future damage and ensures better adhesion during painting or coating.
3. Fix Minor Damage: For minor dents or scratches, use automotive-grade putty to fill in depressions. Smoothen the putty until it matches the bumper’s contour. Let it dry, then sand gently to achieve a seamless finish. Apply a primer before moving on to auto body painting for a durable, long-lasting repair.
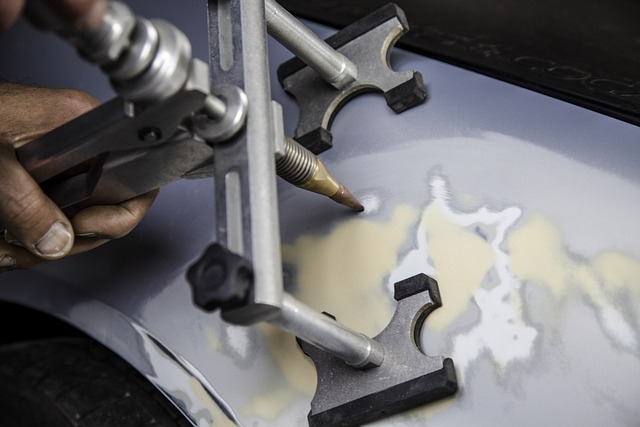
4. Straighten Severe Damage: In cases of significant deformation, frame straightening is necessary. This involves using specialized equipment to return the metal to its original shape. Once straightened, carefully inspect for any remaining imperfections.
5. Paint or Coate: After preparing and repairing, it’s time for auto body painting. Ensure your workspace is well-ventilated, and wear protective gear. Apply the paint evenly, following the manufacturer’s instructions. Two coats are usually sufficient to achieve a professional finish that matches your car’s original color.
Common Pitfalls to Avoid During the Repair Process
When undertaking a rear bumper repair, it’s crucial to steer clear of some common pitfalls that can compromise the quality of the fix and your safety on the road. One of the biggest mistakes is attempting a DIY approach if you lack the necessary skills and experience in car body repair. While do-it-yourself projects can be satisfying, auto body painting and bodywork require precision and expertise to ensure a seamless finish and structural integrity.
Another pitfall involves using subpar parts or not properly preparing the bumper before repairing or replacing it. Using inferior quality components may lead to future damage and compromise your vehicle’s aesthetics. Car bodywork services that cut corners on preparation, such as inadequate surface cleaning and decontamination, can result in poor adhesion of new paint, affecting both the repair’s longevity and final finish. Always opt for genuine parts and ensure proper preparation for the best rear bumper repair outcomes.
When it comes to rear bumper repair, following expert best practices ensures a safe and effective restoration. From assessing damage to choosing the right repair method and avoiding common pitfalls, each step is crucial for achieving a professional result. By adhering to these guidelines, you can effectively fix your damaged rear bumper, enhancing both its aesthetic appeal and structural integrity on the road.