

Mercedes matte finish repairs require specialized tools and techniques due to the unique vulnerability of its scratch-prone surface. Before attempting repairs, assemble a kit with essential tools and high-quality automotive products like polish, microfibers, buffer, sandpaper (from 400 to finer grits), masking materials, gloves, and for complex cases, bodywork tools. The process involves meticulous cleaning, sanding scratches from coarse to fine paper, removing debris, applying compound, and polishing with a microfiber cloth to achieve a seamless match. Precise execution is key to successful Mercedes matte finish restoration.
Are you looking to restore your Mercedes with a flawless matte finish? This guide is your solution for fixing those pesky scratches on your vehicle’s unique matte paint surface. Understanding the characteristics of Mercedes matte paint and identifying common causes of damage is key. Then, equip yourself with the right tools and materials to embark on the repair process. Follow our step-by-step instructions for a successful restoration, ensuring your Mercedes maintains its distinctive and elegant matte finish.
- Understanding Mercedes Matte Paint and Common Scratches
- Gather the Necessary Tools and Materials
- Step-by-Step Guide to Repairing Scratches on Matte Paint Surfaces
Understanding Mercedes Matte Paint and Common Scratches
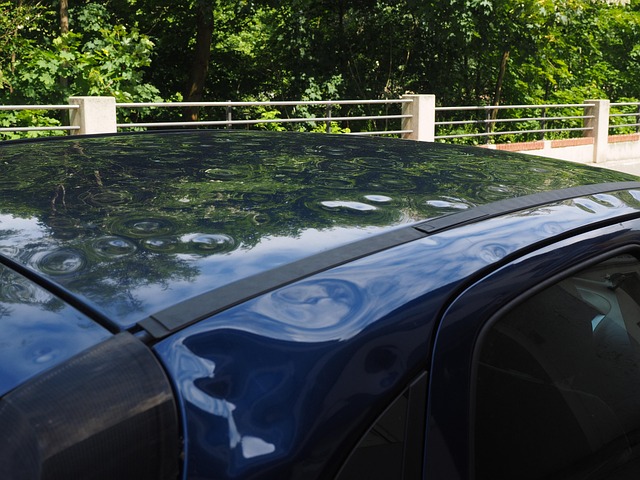
Mercedes matte paint is renowned for its distinctive, non-reflective finish that adds a touch of sophistication to their vehicles. However, this unique surface is also more prone to certain types of damage compared to traditional glossy paints. Common scratches, from everyday contact or minor accidents, can mar the matte finish, revealing a layer of the darker base color beneath. These scratches often appear as faint lines or spots, and while they might not be immediately noticeable on smaller vehicles, they can become quite evident on larger car bodies.
Understanding how Mercedes matte paint works is crucial to effective repair. Unlike glossy finishes that reflect light, matte paints scatter it, creating their distinctive appearance. This means that when a scratch occurs, it disrupts the surface’s uniform scattering of light, leading to the visible imperfections. Car dent repair techniques for matte finishes require specialized tools and methods, focusing on filling and sanding to match the original texture precisely. Vehicle body repair professionals use fine-grit sands and advanced fillers designed for these unique challenges, ensuring that the repaired area seamlessly integrates with the surrounding matte paint job.
Gather the Necessary Tools and Materials
Before you begin Mercedes matte finish repair, ensure you have all the necessary tools and materials on hand. This includes a high-quality car polish or compound, microfibers for application and wiping, and a buffer to smoothen out any imperfections. Additionally, gather some fine-grit sandpaper, a mask to protect your lungs from dust, and gloves to safeguard your hands during the process. For more involved fender repair, you might need specialized tools specific to car bodywork.
An automotive body shop typically stocks these essentials for various types of repairs, including Mercedes matte finish repair. While some enthusiasts prefer DIY methods for minor scuffs and scratches in their car bodywork, professional-grade products offer superior results, especially for more extensive damage. Remember, the goal is to restore your Mercedes’ stunning matte finish, so investing in quality materials will pay off in the long run.
Step-by-Step Guide to Repairing Scratches on Matte Paint Surfaces

Repairing scratches on a Mercedes matte finish surface requires a meticulous approach. Start by gathering your tools and materials: fine-grit sandpaper (starting with 400 and progressing to finer grits), a suitable compound for automotive paint, a polishing pad, and a microfibre cloth.
1. Prepare the Area: Ensure the surface is clean and free of dirt or debris. If necessary, wash and dry the car meticulously.
2. Sand the Scratch: Begin with coarse sandpaper to remove the shallow scratches, then switch to finer grits for more subtle marks. Work in small sections, applying light pressure.
3. Clean and Compound: Remove the sanding dust with a damp cloth. Follow this by applying the compound using the polishing pad, working it into the scratch until it disappears.
4. Polish: Buff the area thoroughly with the microfibre cloth to achieve a smooth, even finish that matches the surrounding matte paint.
Repairing scratches on a Mercedes matte paint surface is a doable task with the right knowledge and tools. By understanding the unique properties of Mercedes matte finish and common scratch types, you can effectively restore your vehicle’s original appearance. With a well-stocked toolkit and a step-by-step guide, you’ll be able to achieve professional results that enhance the overall aesthetics of your car. Remember, prompt action is key to minimizing damage, so don’t delay in taking care of those pesky scratches.