


Mercedes license plate light repair involves identifying root causes like blown bulbs, cracked housings, water damage, or faulty wiring. Professional auto repair shops diagnose and fix issues safely, adhering to local lighting regulations. A DIY guide emphasizes safety with steps including workspace prep, damage inspection, tool gathering, light removal, installation, testing visibility, and maintenance tips for clear night driving.
Ensure optimal visibility with your Mercedes’ license plate lights. This comprehensive guide delves into the common issues and diagnoses problems that may affect their performance. Learn how to identify faulty components, from damaged bulbs to loose wiring, through detailed insights into the repair process. By following our step-by-step instructions, you’ll enhance safety and maintain that sleek, well-lit Mercedes look.
- Understanding Mercedes License Plate Light Issues
- Diagnosing the Problem: Common Causes of Failure
- Step-by-Step Guide to Effective Repair and Maintenance
Understanding Mercedes License Plate Light Issues

Many Mercedes owners often face a common issue with their license plate lights—diminished visibility or even complete failure. This problem can arise due to several factors, making it essential to understand the potential causes before considering a Mercedes license plate light repair. Over time, the bulbs themselves may burn out, especially in harsh weather conditions. Alternatively, the housing around the lights might become clouded or cracked, blocking the necessary light transmission. Some models may also have design flaws that predispose them to moisture intrusion, leading to electrical malfunctions.
Identifying the root cause is crucial when seeking an effective auto repair shop solution. An experienced mechanic will assess whether a simple bulb replacement is sufficient or if more intricate repairs are needed, such as sealing housing cracks or replacing faulty wiring. Opting for professional automotive repair services ensures that any repair is executed correctly, enhancing safety and compliance with local lighting regulations.
Diagnosing the Problem: Common Causes of Failure

Diagnosing the problem is the first step in any successful Mercedes license plate light repair. The most common cause of failure is a simple issue like a blown bulb, which can easily be replaced. However, there are more intricate problems that require a thorough inspection. Over time, the housing around the license plate lights might crack or become damaged, leading to water ingress and subsequent corrosion, affecting the functionality of the light.
Another common issue is loose or faulty wiring, often resulting from a fender repair or collision repair services. These can disrupt the power supply to the lights, causing them to flicker or not illuminate at all. It’s important to identify the root cause of the problem to ensure a permanent fix. Car paint services, while essential for aesthetics, should not interfere with proper lighting function.
Step-by-Step Guide to Effective Repair and Maintenance

Repairing your Mercedes license plate light is a straightforward process that can significantly enhance night-time visibility and overall vehicle safety. Here’s a step-by-step guide to ensure effective repair and maintenance:
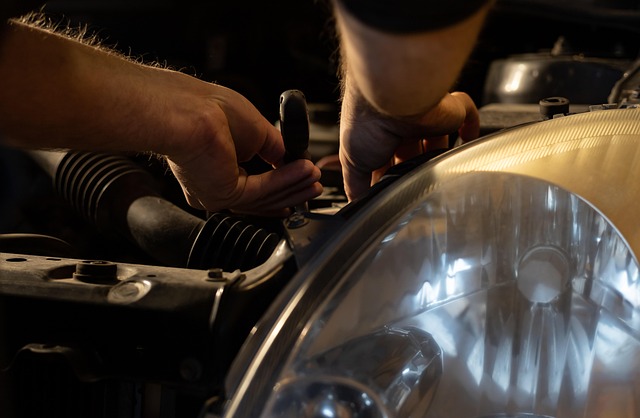
1. Safety First: Ensure your car is parked in a safe, level area and engage the parking brake. Turn off the engine and allow it to cool down before proceeding. Safety glasses are recommended for protection during the repair process, especially when dealing with any components that could produce debris.
2. Inspect the Damage: Carefully examine the license plate light housing and lens for cracks or damage. If there’s a broken lens, you’ll need to replace it. Even small chips or cracks can significantly reduce light output and visibility.
3. Gather Supplies: You’ll require a replacement Mercedes license plate light (ensure it’s compatible with your model), a Phillips-head screwdriver, and a plastic tool for prying if necessary. For more complex repairs involving car paint repair, you might need touch-up paint specific to your vehicle’s color—or even an auto glass replacement if the lens is severely damaged.
4. Remove the Light: With the car still parked and secure, locate the license plate light assembly. Remove any screws or clips securing it in place using the appropriate tool. Gently pull out the old light and set it aside for disposal or recycling.
5. Install the New Light: Insert the new light carefully into the housing, ensuring proper alignment. Secure it with the provided screws or clips until fully fastened. Double-check that the new light is functional and emits a clear, bright beam.
6. Test and Adjust: Drive your Mercedes at night to test the new license plate light. Ensure it’s visible from all angles, illuminating the license plate clearly. Make any necessary adjustments for focus or direction if offered by your vehicle’s design. Regular maintenance involves checking the lights periodically to ensure optimal performance and replacing them as needed, much like other car dent repair or auto glass replacement tasks.
Mercedes license plate light repair is a crucial aspect of vehicle maintenance, ensuring optimal visibility for both drivers and law enforcement. By understanding common issues and diagnosing them effectively, you can easily address problems with your Mercedes’s license plate lights. Regular upkeep as outlined in our step-by-step guide will prevent future failures, enhancing safety and compliance on the road.